6.5 KiB
| title | license | origin_url |
|---|---|---|
| Repository Mirrors | Apache-2.0 | e865de1e9d/docs/content/usage/repo-mirror.en-us.md |
Repository mirroring allows for the mirroring of repositories to and from external sources. You can use it to mirror branches, tags, and commits between repositories.
Use cases
The following are some possible use cases for repository mirroring:
- You migrated to Forgejo but still need to keep your project in another source. In that case, you can simply set it up to mirror to Forgejo (pull) and all the essential history of commits, tags, and branches are available in your Forgejo instance.
- You have old projects in another source that you don’t use actively anymore, but don’t want to remove for archiving purposes. In that case, you can create a push mirror so that your active Forgejo repository can push its changes to the old location.
Pulling from a remote repository
For an existing remote repository, you can set up pull mirroring as follows:
- Select New Migration in the Create... menu on the top right.
- Select the remote repository service.
- Enter a repository URL.
- If the repository needs authentication fill in your authentication information.
- Check the box This repository will be a mirror.
- Select Migrate repository to save the configuration.
The repository now gets mirrored periodically from the remote repository. You can force a sync by selecting Synchronize Now in the repository settings.
❗❗ NOTE: You can only set up pull mirroring for repositories that don't exist yet on your instance. Once the repository is created, you can't convert it into a pull mirror anymore. ❗❗
Pushing to a remote repository
For an existing repository, you can set up push mirroring as follows:
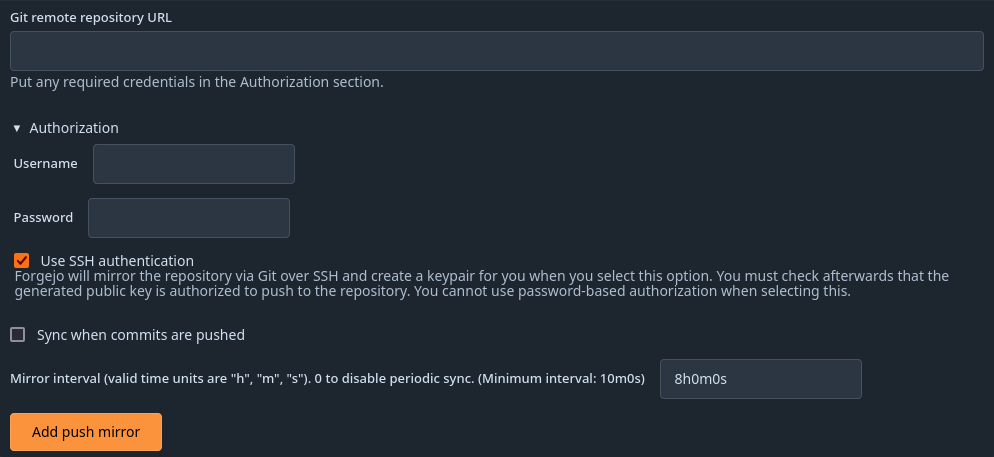
- In your repository, go to Settings > Repository, and then the Mirror Settings section.
- Enter a repository URL.
- If the repository needs authentication expand the Authorization section and fill in your authentication information. Note that the requested password can also be your access token.
- Select Add Push Mirror to save the configuration.
The repository now gets mirrored periodically to the remote repository. You can force a sync by selecting Synchronize Now. In case of an error a message displayed to help you resolve it.
❗❗ NOTE: This will force push to the remote repository. This will overwrite any changes in the remote repository! ❗❗
Setting up a push mirror from Forgejo to GitHub
To set up a mirror from Forgejo to GitHub, you need to follow these steps:
- Create a GitHub personal access token with the public_repo box checked. Also check the workflow checkbox in case your repo uses GitHub Actions for continuous integration.
- Create a repository with that name on GitHub. Unlike Forgejo, GitHub does not support creating repositories by pushing to the remote. You can also use an existing remote repo if it has the same commit history as your Forgejo repo.
- In the settings of your Forgejo repo, fill in the Git Remote Repository URL:
https://github.com/<your_github_group>/<your_github_project>.git. - Fill in the Authorization fields with your GitHub username and the personal access token as Password.
- (Optional, available on Forgejo 1.18+) Select
Sync when new commits are pushedso that the mirror will be updated as well as soon as there are changes. You can also disable the periodic sync if you like. - Select Add Push Mirror to save the configuration.
The repository pushes shortly thereafter. To force a push, select the Synchronize Now button.
Setting up a push mirror from Forgejo to GitLab
To set up a mirror from Forgejo to GitLab, you need to follow these steps:
- Create a GitLab personal access token with write_repository scope.
- Fill in the Git Remote Repository URL:
https://<destination host>/<your_gitlab_group_or_name>/<your_gitlab_project>.git. - Fill in the Authorization fields with
oauth2as Username and your GitLab personal access token as Password. - Select Add Push Mirror to save the configuration.
The repository pushes shortly thereafter. To force a push, select the Synchronize Now button.
Setting up a push mirror from Forgejo to Bitbucket
To set up a mirror from Forgejo to Bitbucket, you need to follow these steps:
- Create a Bitbucket app password with the Repository Write box checked.
- Fill in the Git Remote Repository URL:
https://bitbucket.org/<your_bitbucket_group_or_name>/<your_bitbucket_project>.git. - Fill in the Authorization fields with your Bitbucket username and the app password as Password.
- Select Add Push Mirror to save the configuration.
The repository pushes shortly thereafter. To force a push, select the Synchronize Now button.
Mirror via SSH
Forgejo supports the use of SSH as an authentication method for push mirrors.
You can enable this when adding a new push mirror, existing push mirrors cannot be configured to use SSH.
This feature is only available if Forgejo is able to find the ssh executable.
To use SSH as authentication method, select the Use SSH authentication option in the authorization tab when adding a new push mirror.
Make sure to use ssh conform URLs for Git Remote Repository URL, which is e.g. git@forgejo.org:<your_forgejo_group>/<your_forgejo_project>.git for Forgejo (differs to the default authorization approach as mentioned above).
Make sure to not fill in the Username or Password input.
Forgejo generates an Ed25519 SSH key pair and saves it for you.
After adding the push mirror, you can click the Copy public key link to copy the public key to your clipboard.
This public key can then be added as a deploy key on the target repository, how to add one varies by platform but generally it should be an option in the repository's settings. After adding the public key as the deploy key, you can go back to Forgejo and click the Syncronize now button and see that it works.

